
32 - Fly Tying Top Tips - Really Easy Flies
Really easy flies to tie part 1: The Black & Peacock Spider
Whether you’re short on time, or have just started learning to tie flies, you needn’t be an expert to create really effective fish catchers! In this new mini series, fishing author Dom Garnett shows us a handful of his favourite flies in the “simple but deadly” category.
The world of fly tying can seem a pretty bewildering place these days. From the starting point of a hook and thread, the possibilities and sheer range of materials are vast. However, just because we can tie incredible works of art or amazingly detailed insect replicas, there is nothing wrong with keeping things simple.
If you’re reading this looking for some fly tying tips for beginners, the patterns I’ll show you in this series should prove nice and easy to tie. That said, there is no harm for more experienced tyers to get back to basics a little and I’ll be showing you how, with just a little tweak here and there, some really simple, quick flies can be incredibly versatile- and well worth a second look!
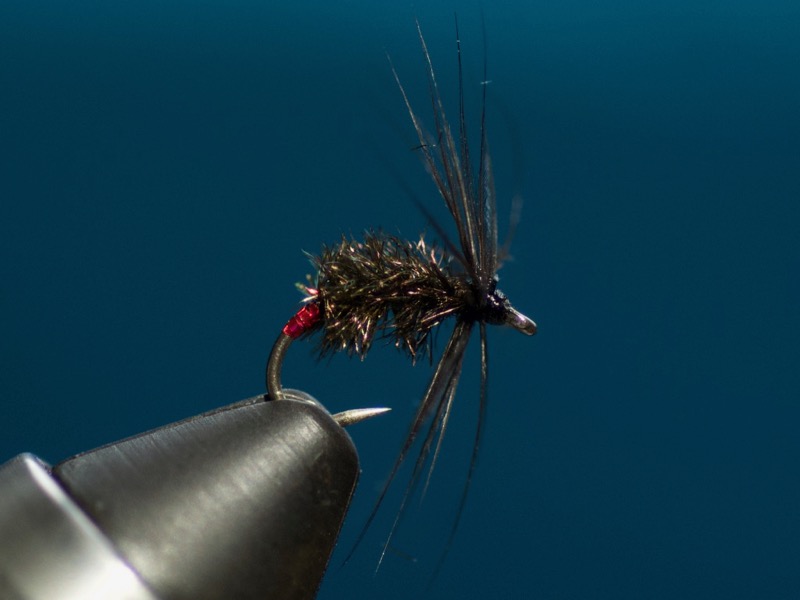
The Black and Peacock Spider, step by step
The Black and Peacock Spider has to be one of the most classic, versatile flies of all time. It’s my starting choice for this series for the simple reason that no other fly has caught me more different species of fish, from wild brown trout to rudd, roach and carp. It’s also lovely and simple to tie. With a bit of practice you can turn one out in less than five minutes. Just as well, because I get through dozens every season.

Whether the trout are wild or stocked, browns love a Black and Peacock
For those newer to fly tying, spiders are simple, soft-hackled flies with a rich tradition in the UK. They are not perfect insect replicas (and in spite of the name, they don’t copy actual spiders), but suggestive creations, often with just a thread body and “legs” fashioned from feather fibres. Perhaps this is why they’re so versatile?

Rudd are another species that love this simple, timeless fly.
In a way, their simple efficiency reminds me of German beer brewing: no silly additives or flavour, just simple, high quality ingredients (in fact, like German Pilsner, just four will do it). Here’s the recipe:
What you Need:
Hook: Sizes 12-16 - Wide gape grub or barbless grub
Thread: Black
Tag (optional): Contrasting tinsel or wool of your choice (red is ideal)
Body: Peacock Herl
Hackle: Black hen

Very, very simple ingredients. In fact the tinsel is entirely optional and we could create the whole thing with just hook, thread, peacock herl and a hen feather!
STEP 1: Run some black thread onto the hook, leaving a little gap behind the eye. Pinch in place, until a few turns of thread catch in securely- trim the loose end if necessary.

STEP 2: Now run the black thread in tidy, touching turns down the hook shank. If you want to add a “butt” or “tag” of brighter colour at the rear, now is the time to catch it in. To keep the body even, use a long strip of material and trap all the way down the back. I’ve used red UV tinsel here.

STEP 3: Now pick out a couple of strands of peacock herl. Pick finer pieces for a tiny fly, or go thicker for a bigger, bushier number. Once you’ve got them to hand, stroke the fibres back with your fingers so they fluff out, like this:

STEP 4: Now tie in the peacock herl, clamping down right the way down the back of the hook shank to keep things nice and even. If you tie just by the “tips” you get an uneven less secure body, so go right down the hook and bring the thread back to the rear of the fly.

STEP 5: Next, we wrap the thread around the peacock strands. You don’t absolutely have to do this, but doing so traps the peacock in place better and makes for a much more secure fly, that won’t unravel after a fish or two.

STEP 6: Now wrap the thread and peacock from back to front in even turns, like this. Once you’re a short distance from the eye, trap the peacock in place tightly with 2-3 turns of the black thread as shown. It’s important to leave a little gap here, because we don’t want to crowd the head of the fly (or it will be difficult to tie onto our leader!).

STEP 7: Now trim off the peacock as tight as you can. If you are new to fly tying I can hardly over-emphasise the need for a quality, sharp pair of scissors here! Don’t be a skinflint, because fine-tipped scissors are a fly tyer’s best friend and make various jobs much easier.

STEP 8: Now take a black hen feather. If you’re newer to fly tying, a small pack of feathers should tie several flies without breaking the bank. Choose a feather where the fibres or “spikes” are in proportion to the hook size. Fibres that are 2-3 times the width of the hook gape (the gap between the hook point and the shank above) look about right. Prepare it by gently teasing out the feather fibres and stripping a little at the front with your thumb nail, so it’s easy to tie in, as shown here:

STEP 9: Now tie in place as shown , with two or three nice tight turns of thread, just behind the eye.

STEP 10: Now comes the slightly trickier part. Holding the end of the feather, wrap it around in two neat, tight turns, so that the feather fibres splay out like the spokes of an umbrella. Hackle pliers (a tool which keep the feather pinched in place) can make the job easier if you’re struggling.
It’s tempting to make loads of wraps, but just make two before carefully trapping the feather in place with another 2-3 turns of thread! So often in fly tying, less is more because sparser materials move better and won’t crowd the fly. Once you’re happy, you can trim off the excess.

STEP 11: Now all that’s left to do is finish the fly. A whip finish tool is the tidiest way to do this- it’s not easily explained in words, so take a look at one an online tutorial, such as this one by Peter Gathercole. If you’re struggling though, or don’t have the right tool, you could always just varnish, leave to dry and then carefully trim off with scissors (the fish won’t mind and if you’re just starting out tying we won’t tell anyone).

There we have it, job done! One of the easiest flies to tie for beginners, but also one that the most experienced anglers still swear by.
Further ideas and useful variations
So, hopefully with a bit of practice, you will be tying these simple flies quickly and your efforts will get tidier. Actually, don’t fret if the early versions are messy, because the fish won’t mind a great deal- this isn’t a super “fussy” or accurate fly. Whether you fish it gently, just letting it swing round in the breeze, or indeed pull it like a loch style fly, it’s a great pattern.
Once you’ve cracked the basic tying, you may also want to experiment with materials and variations. One thing you can do immediately is try different models and sizes of hook. Small, fine hooks and sparse dressings can be useful for low, clear water and finicky feeders. Bigger brutes, on the other hand, are great for blustery days and aggressive fish. Of course, different weights and sizes of hook will also give you very different sink rates.

By all means experiment as you like with this fly. My favourite twists include adding a small bead (above left) for a faster sinking fly, or tying sparser with a red tinsel rib and lighter hook (above middle), which works excellently for trout feeding in the upper layers. Finally, you can also tie it more boldly, with a red tag and perhaps a thicker body (above right) great for loch style fishing.
Above all, have fun and I repeat, don’t worry if your early efforts are a bit unkempt. I guarantee you will still catch fish on this fly! Happy tying and keep an eye out for more patterns this summer- next time I’ll be showing you a really simple but brilliant dry fly to tie yourself.